Snowflakes with Rulers

Blue Snow Bordered

Every August through September our local grocery store puts back-to-school items on major discount. This past year I came across a pile of wooden rulers for twenty five cents each. I racked my brain for a crafty use for such a cheap item. I’m ALWAYS on the look out for opportunities such as this, because crafts can be quite pricey and stressful if one is not careful enough.

I eventually came to SNOWFLAKES! Even though the end of summer is a little early to be thinking about blustery weather, I knew that I would thank myself in the blink of an eye for having prepared something ahead of time. So I purchased 16 rulers to stack on top of one another and make 4 snowflakes with. If you include the paint, hot glue, and buttons, this craft came to barely $10.00, which calculates to about $2.50 a snowflake. In my opinion that’s not bad. Especially considering the paint can be (and will be) saved for other projects in the future.

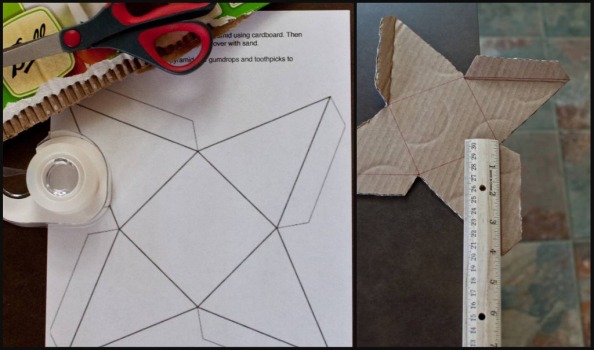
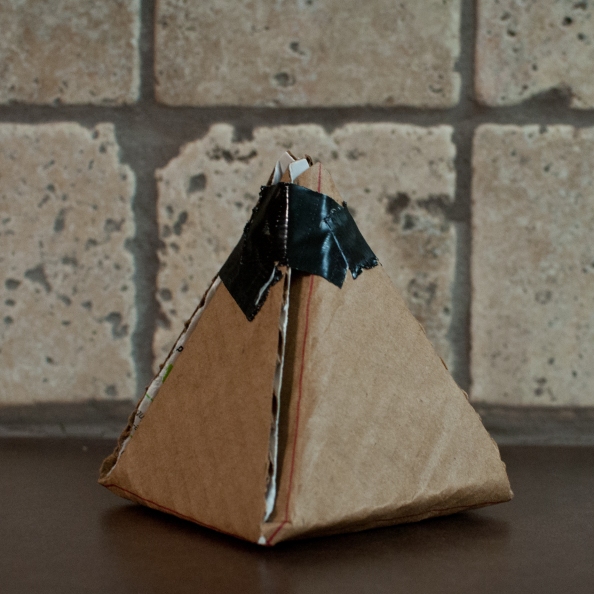
Construction for this project was a cinch. We simply painted on color and glitter, hot glued the layers together at the center once the paint was all dry, and then covered the center hole with a cute coordinating button. It was fun for the girls and fairly stress free for me.

Haikus Bordered

I don’t mind doing a craft for a crafts sake in our homeschooling, but I wanted to take advantage of our time together and teach . . . something. Since my girls already know about the basic wonders of snowflakes, I settled on haikus. We had read a few over this year, including the long one I wrote about cornucopias and I wanted to give them a chance to write their own. It proved to be a great exercise for language in practicing syllables. It was adorable to watch them test sentence after sentence on their little fingers to see if what they came up with would fit five and then seven beats. They did an excellent job in the end with very little help from me, which I’m happy for.

White Snow with Haiku Bordered

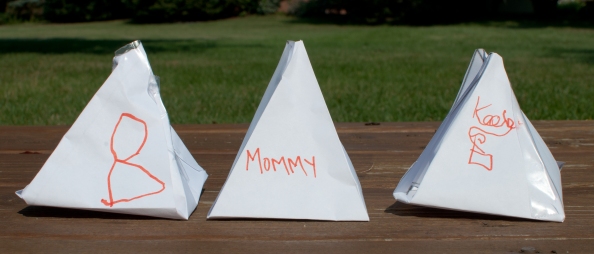
Both my five and seven year old wrote out their haikus (which is bonus practice for each of their writing skills) and we hung them from the bottom of their snowflakes with decorative yarn. To show off all of our creations, I attached them to the walls using poster putty. Since the rulers were so light, they stuck very well and to this moment haven’t budged. The snowflakes are right next to our Christmas tree and the glitter sparkles so beautifully in the evening glow of lights. It’s only too bad that these will eventually have to come down again and be stuffed into a baby box!

Snowflakes All Bordered

Pumpkin Cycle Spinner Plates

Spin the Cycle Title Photo

I love it when my girls and I “stumble” upon education. We were at our local library a while back checking out books. Lord love those librarians who display seasonal reads atop their shelves! Staring at me eye level was the book “Life Cycle of a Pumpkin” and I picked it up. To my surprise, when we got home, my girls wanted me to read it over and again. They were enthralled.

Book

I decided to encourage their excitement towards this fall topic and develop a craft that would dedicate the life cycle of a pumpkin to their memories. Thus our Pumpkin Cycle Spinner Plates were born! It’s a very simple, very cheap, and very fun project.

pumpkin supplies

The following supplies are needed for each student for this craft, two paper plates, a sponge brush, orange paint, a brown foam sheet, scissors, a stapler, glue, coloring utensils, a craft brad, glitter glue, green ribbon, and a hot glue gun. Of course some of these may be omitted for a simpler version.

To start our pumpkins, I dressed my girls in their worst clothes and let them go paint happy on their paper plates. To their delight, they were instructed to cover every inch in orange. Afterwards, as these were laid aside to dry, they each cut out a stem for their pumpkin from a brown foam sheet, which I later stapled to the back of the top plate.

Cutouts

Next I handed my girls a sheet of images depicting the steps in the life cycle of a pumpkin to color and cut out. Since I had a hard time finding the images I wanted online, I was forced to draw and copy my own. I will definitely be saving a master copy for the future!

Pumpkin Steps

After those were done and the plates were dry, I traced out a small triangle on the side of the top plate for my girls to cut out. This would act as a window. Then I laid the top plate over the bottom plate and lightly marked six x’s on the bottom plate with a pencil to direct them where to glue on their images. Once the order of those images were double checked and the glue was sufficiently dry, I placed the top plate back over the bottom plate and poked a hole through both dead center using a pencil. This was where I secured a small brad , which gave us the spin we wanted. The bottom plate could be turned round and round, windowing one step in the life cycle of a pumpkin at a time!

To add a little pizzaz, we also glittered lines on the face of the pumpkin and added a green bow over the staple holding the stem in place, using a hot glue gun.

Spin the Cycle Title Photo

The best part about this educational craft is that my girls get the opportunity not only to show off their art to anyone and everyone, but also explain the life cycle steps of a pumpkin that they learned.

Cuneiform Tablets

Cuneiform Collage

I am introducing my girls to World History this year and am learning so much personally! I had to give a lesson on the first civilization Sumer and the information was heavy and detailed for their level. I never fear offering too much however, because I know some is getting absorbed and the subject is sure to be repeated years later. I did want to engage them in a project to help them relate to the subject and hopefully commit some of what we learned to memory. One of the ways Sumer developed as a civilization was through their written language cuneiform. When I surveyed some examples of this writing and noted it’s simple lines and triangle shapes, I knew it was perfect thing to engage my girls with. I decided we would simply mimmic ancient scribes by molding tablets out of clay and pressing these shapes into them. I found the alphabet on the internet and what you see here is my girls attempts to write their names. The left is my second grader’s and the right is my kindergartener’s. Not bad huh?

Manna Makin’

Image

My second grader Keeley is studying Moses and the Israelites this fall for Bible. One of the projects in her curriculum was to make your own manna. How fun! This was a great opportunity to steal my dear daughter away from all those monotonous worksheets and enjoy some hands on learning.

Image

These are the ingredients we used. We basically threw them all into a giant bowl, stirred them up with a spatula until it came together, and then kneaded it slightly on a floured surface. I let Keeley get as messy as she darn well wanted. After all this wasn’t our family dinner. Once the dough was kneaded we separated it into uniform balls which we flattened out into disks. A few minutes in a 350 degree oven on a pizza stone and they were ready! This recipe gave quick return for your work, which is good when including eager impatient children.

Image

The Bible tells us that God’s “Rain from Heaven” tasted sweet like wafers with honey. Well I have to say that ours tasted sweet as well. The manna was very subtle and pleasing on the pallet. Our whole family gobbled them up in 5 minutes flat, including Daddy!

Pyramid Building

Pyramids-11

How does one make a seven and a five year old sit still for a world history lesson? By promising a craft to follow! That’s what I had to do when I gave a lesson on the correlation between religion and history this week. I tried my best to repeatedly explain that if it were not for the ancient Egyptian’s beliefs the great pyramids still standing today would not even exist, but the eyes moving around the room and the involuntary wiggles were telling me that the craft was much more important than my words. My girls may not remember that people’s choices are driven by their personal beliefs and religion, thus effecting our world history, but they will remember what a pyramid is and how to build one!

Cut out Pyramid

Good thing I had something prepared in advance. Yes the day before I had printed out a template for a paper pyramid I had found online and used it to cut out a sturdy piece of recycled cardboard. I then took painful care to cut that out and proceeded to use a ruler to guide my bends in all the needed places.

Pyramids-3

All that was left then was to secure my pyramid in place with duct tape and clean up my giant mess. This preassembled beauty would have to wait overnight for eager hands to decorate it.

Critically Think Pyramid

The following day after my semi – successful verbal history lesson I gave each of my girls their own paper templates. I also placed my own pre assembled paper pyramid out on the table for them to study. At this point I hadn’t even pulled out the preassembled cardboard pyramid because I first I wanted to give them an opportunity to develop their critical thinking skills. My husband and I are firm believers in molding these skills. Rather than tell them how to do it, I simply said, “There is a way to cut, fold, and tape this together into a pyramid like Mommy’s. Try and put yours together by yourself.” My seven year old figured it out single handedly in minutes. My five year old got very far by herself as well, but needed a little guidance in understanding the flaps along the sides of each triangular wall.

Pyramids-7

They finished and we put all three paper pyramids side by side and relished in our success!

Glue and go Crazy Pyramid

Now came the fun part. I whipped out the preassembled cardboard pyramid and explained to the girls that if it were a real pyramid it would be out in the desert and covered in sand. They knew what to do and were already getting their hands dirty before I had finished speaking. By the way this is and OUTDOOR project for those of you who may want to try it. I gave each of the girls, even my two year old who quite enjoyed herself, a sponge brush and a cup of glue and instructed them to cover the pyramid all over. They did so in a blink. The next step needed no instruction, they got good and dirty dousing the now sticky pyramid all over with sand. Far more sand than needed at that. I was so glad that we just happened to go to the beach over the weekend so that I could collect some. Of course I could have just as easily taken it out of their sandbox as well.

Pyramids-11

That was that. The pyramid was very realistic looking just small. I made a point to ask the girls how big we would be standing next to our sandy pyramid and they agreed that we would be as tiny as ants. Great! They get it. In fact my five year old insists that we go to Egypt and see the real ones. What could I say? Maybe someday . . .

Shoe Lacing Project

Image

My girls wear Crocs, flip flops, boots, and random slip on shoes year round. Truth be told they do not own a pair of traditional sneakers. This dawned on me the other day and I then realized that I had skipped over one childhood right of passage in the conquering of shoe lace tying! My eldest daughter Keeley is 7yrs old and she still doesn’t know how to tie a shoe. Shame on me. I’ll bet my shame is not solely mine though which is exactly why I want to share this fun craft with everyone. The following are rough directions for paper shoe’s with ribbon laces.

Image

To start this project I studied a diagram of a shoe online and hand drew my own version. I made a fold down the center of my paper and cut half of my drawing around to ensure that the shoe would be even on both sides. I then traced my detailed sections like the toe cover and the side stripe to cut out separately and use as templates.

Image

Once the templates were all cut and ready, I rounded out small pieces of scotch tape and attached them to the back of each template. Then came the most fun part, I chose combinations of scrapbook paper to cut out for each section of the shoes. This probably took way more time than it needed to, but for those of you out there who scrapbook, you will understand when I say this activity can be very cathartic! Once I had made my choices, I got to cutting and grouping my shoe pieces together. I also chose to cut out an extra shoe base with heavy card stock to strengthen each of my shoes. Cardboard would be an even sturdier choice for this if you prefer.

My next step was to assemble my shoes. This step was incredibly fun too, because it’s the first time I saw my creations come together. Since I intended to decoupage the entire shoe, I didn’t spend a whole lot of time tacking down each piece with a glue runner. There were inconsistencies and imperfections once the shoes were assembled. Some of my pieces were hanging over the shoe. To fix this problem I simply cut around the perimeter to even everything out again.

Image

Once I was satisfied with my shoes, it was time to decoupage. I did have some modpage on hand, but it’s a fairly expensive product and I didn’t want to waste it. Modpage is better than homemade recipes for those projects that include photos because elmers glue will yellow over time. For this particular project however I wasn’t overly concerned with that.  So I choice to follow a recipe that combines one part elmers glue with one part water. I combined each of these in a mason jar and shook vigorously. That’s all there was to it. I placed each of my shoes on a piece of wax paper and applied the glue all over with a sponge brush. I noticed right away that some of the thinner scrap pages I chose for my shoes started to bubble up. For that reason I would suggest using heavier card stock-weighted pages for your shoes. Live and learn I suppose. After each shoe was glued I allowed it to dry on a baker’s rack overnight.

Image

After the shoes were dried completely, my final step was to lace them! But of course this requires holes. I measured out where I wanted the holes on my template first and used a hole punch on my marks. Then I placed my template out over each finished shoe and traced these holes with a pencil. Afterward I carefully punched those out and followed up with a careful eye and an eraser to make sure none of my pencil marks were left behind. Last but not least I made my ribbon choices and measured out how much I would need for each shoe (I would suggest being very generous with your cuts because you can always trim a longer piece down, but you cannot add more to a short piece). I laced the ribbon through each shoe and stood back to sigh happily at my work. I could hardly wait to show my girls!

Image

My first born Keeley is 7 and quite the little artist. I thought she would take to her tying right away, but instead she became frustrated when she could not get her bow perfect the first time and a crying fest took over. I should have known she would be hard on herself.

Image

My second born Bree is 5 and I expected her to struggle and even be disinterested because of her young age, but surprisingly she had a great attitude and wanted to tie her bow over and again. Of course I had to help her each time and she never was able to tie one solo, but that’s the beauty of these shoes, I will always have them for her to practice and improve with!

All in all this was a load of fun and I think time well spent. Now my girls can proudly complete the shoe lacing right of passage 🙂